Growing Blog
Growing Mushrooms In Bottles
One of the biggest problems facing the mushroom industry today is the reliance on plastic bags as fruiting containers.
Now, don’t get me wrong… I think mushroom grow bags work great.
But- these one-use Polypropylene (PP) or High-Density Polyethylene (HDPE) bags are far from the most environmentally friendly way to grow.
Luckily, growers can avoid making mountains of disposable plastic bags by instead growing their mushrooms in small, re-usable bottles.
Not only are the bottles more environmentally friendly, they’re also able to be handled by machines. This allows aspects of the operation to be mechanized, reducing labor costs and increasing overall efficiency.
Talk about win-win!
And before you think this isn’t for you, consider that growing mushrooms in bottles aren’t just for large scale commercial growers.
Home growers, too, can benefit greatly by using bottle culture techniques.
WHY GROW IN BOTTLES?
Growing in bottles isn’t a new concept.
In Japan, cultivators have been using bottle culture techniques for decades, and the popularity seems to also be rising in the USA. That’s probably because these methods provide a number of distinct advantages.
Better For The Environment
Mushroom grow bags are one-use only, resulting in mountains of plastic bags headed straight for the landfill. Bottles, on the other hand, can be used over and over for several years. Growers are always trying to come up with ways to produce less waste, such as re-suing bags, or even using containers like 5 gallon buckets. Unfortunately, none of these methods work nearly as well growing in bottles.
Mechanization
This won’t make much impact for home growers or small scale farmers, but large scale operations can see huge improvements in efficiency and labor costs through the mechanization offered by bottle growing.
Consistency
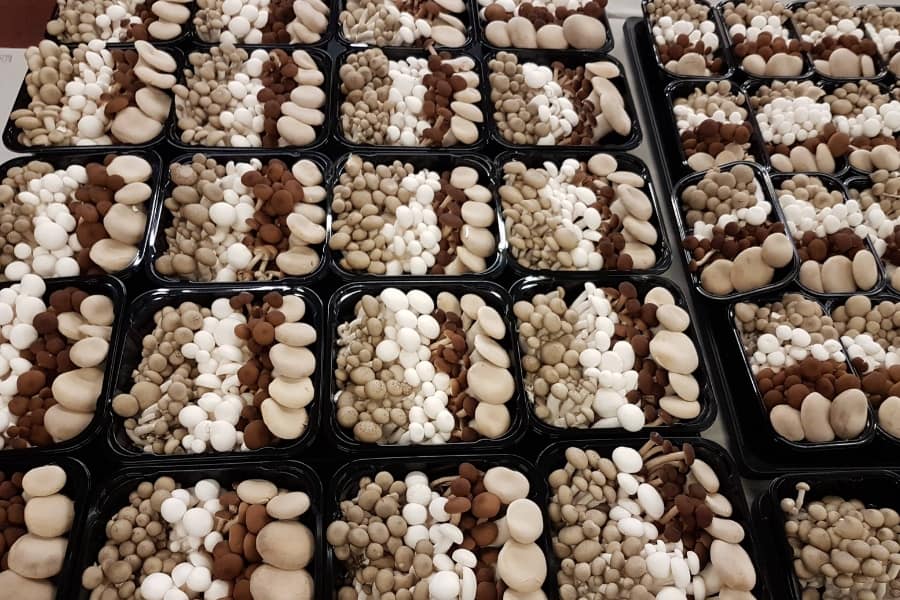
Growing mushrooms in bottles can result in extremely uniform fruits, which makes it easier to harvest, package, and market your mushrooms. When grown this way, they are also quite suitable to be shipped long distances and sold into other markets.
Admittedly, these are some pretty HUGE advantages.
Sounds like a no brainer, right?
Well, before you jump over to Ali-Baba and start ordering your machines, you might want to consider some of the disadvantages of bottle culture.
Species Are Limited
Not all mushrooms can be cultivated in bottles- whereas almost any mushroom that can be cultivated at all, can be grown in bags.
High Start Up Costs
The costs associated with starting a bottle mushroom farm are sky-high at first. It requires several expensive machines, plus the outrageous initial cost of all the bottles. m!
This could easily add up to several hundred thousand dollars. In other words, you’d better have some serious cash, and be quite sure of the market before starting this kind of operation.
Bag cultivation, on the other hand, can be started very small scale- all you really need is a small pressure cooker and some relatively cheap grow bags!
Smaller Mushrooms
Bottle cultures typically produce smaller mushrooms.
Maitake, for example, can be grown in both bottles and bags. However, the clusters or “fronds” from the Maitake will be significantly larger when using the bag method, and the overall yield will also likely be higher.
Slower Colonization Times
Compared to bags, it generally takes much longer for bottles to colonize before fruiting. This is because bags can be thoroughly mixed after colonization, whereas the bottles are inoculated by pouring spawn or liquid culture in the center of the substrate (usually in an open hole), and cannot be mixed.
Single Flush
When grown in bottles, the mushrooms are usually only harvested once, with no second flush. This is because the amount of substrate does not support a significant second flush, and it is found to be not worth pursuing in most cases.
Which Mushrooms Can Grow In Bottles?
As mentioned above, not all mushroom species will fruit in bottles. Some species technically can be grown in bottles, although it might not make economic sense to do so.
However, many species have excellent success using the bottle culture method. These include:
King Oyster (Pleurotus Eryngii)
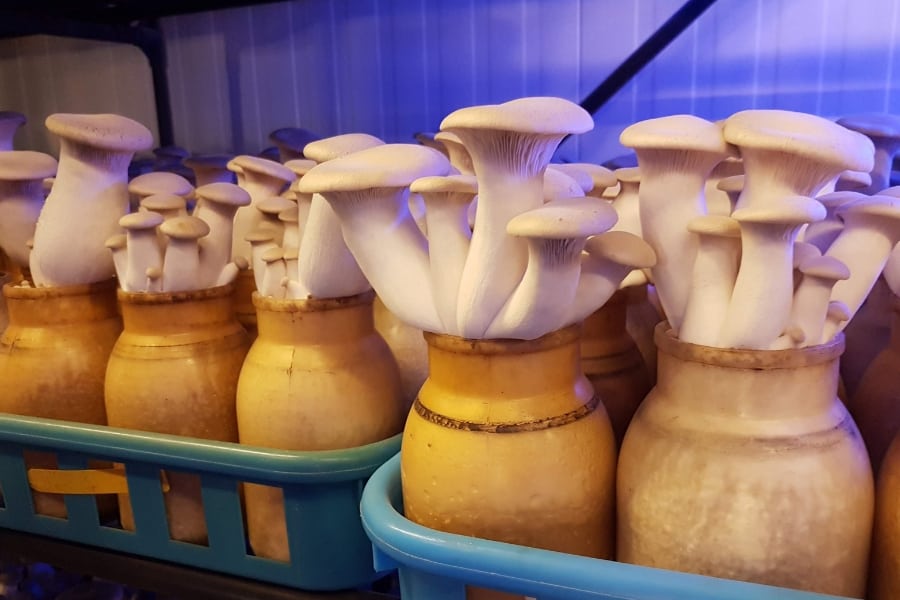
King Oyster can grow in both bottles and bags.
In bottles, the mushrooms are often grown with small caps and large fat stems. When grown this way, they can have a significantly longer shelf life and can sustain less damage when transported long distances.
Many other species of Pleurotus can also be grown in bottles, such as P. ostreatus, P. citrinopileatus, P. columbinus, and many more.
Enoki (Flamulina velutipes)
Enoki, also known as the “winter mushroom” is one of the most commonly cultivated mushrooms in the world- even outpacing Shiitake and King Oyster production in Japan, where bottle culture techniques are extremely common.
Growing Enoki in bottles allows cultivators to get the uniform looking clusters of enoki with long stems and tiny caps. They do this by inserting a “sleeve” around the mouth of the bottle after pinning, which forces the enoki to grow tall and skinny.
Shimeji (Hypsizygus tessellatus)
Also known as the Beech Mushroom, Shimeji is most often grown in bottles.
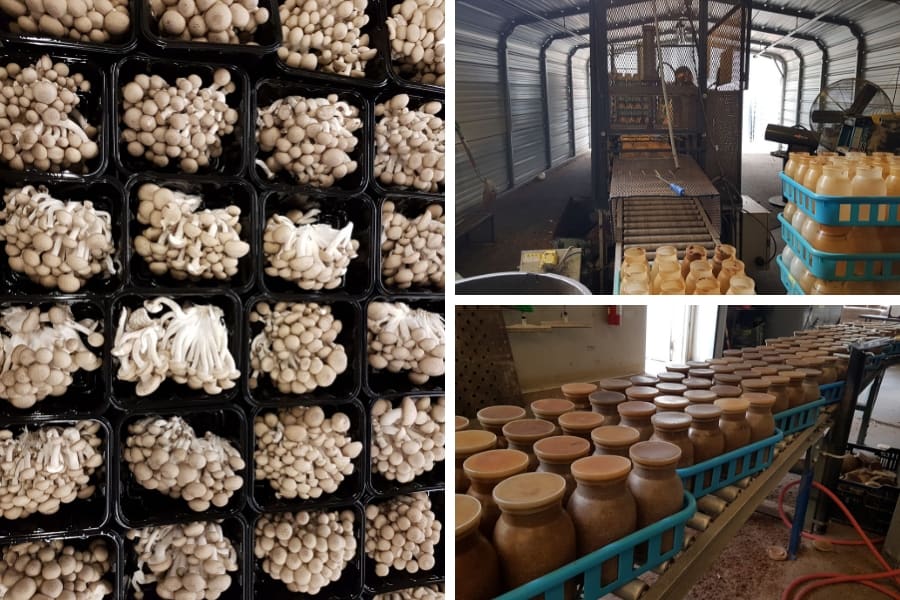
The result of bottle growing is small, uniform clusters of firm, long lasting mushrooms. They come in white and brown varieties.
Shimeji does not seem to be all that common in my neck of the woods, but in Japan and other Asian countries, they are incredibly popular.
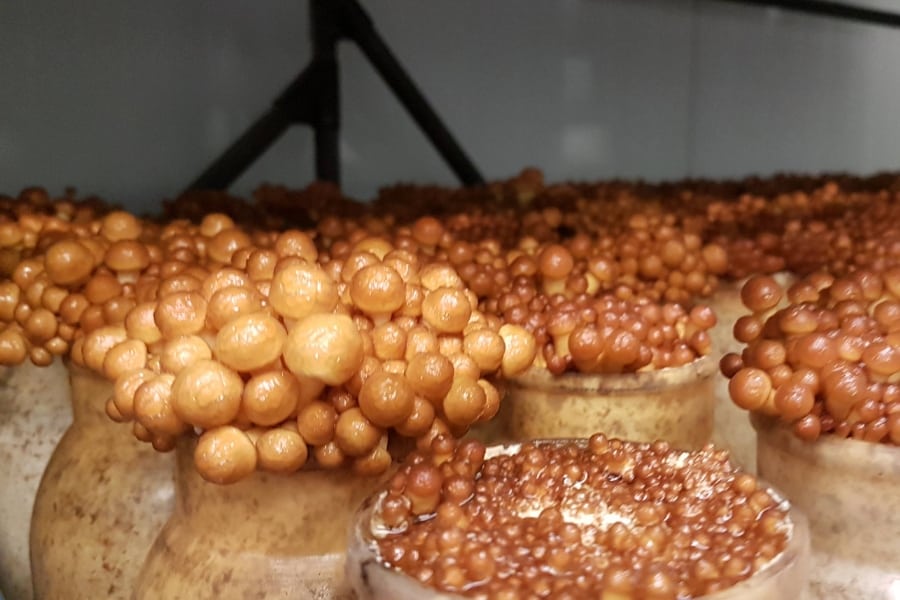
Nameko (Pholiota Nakemo)
Nameko are another popular mushroom commonly grown in bottles.
They grow in clusters of dozens of little tiny, slimy capped mushrooms.
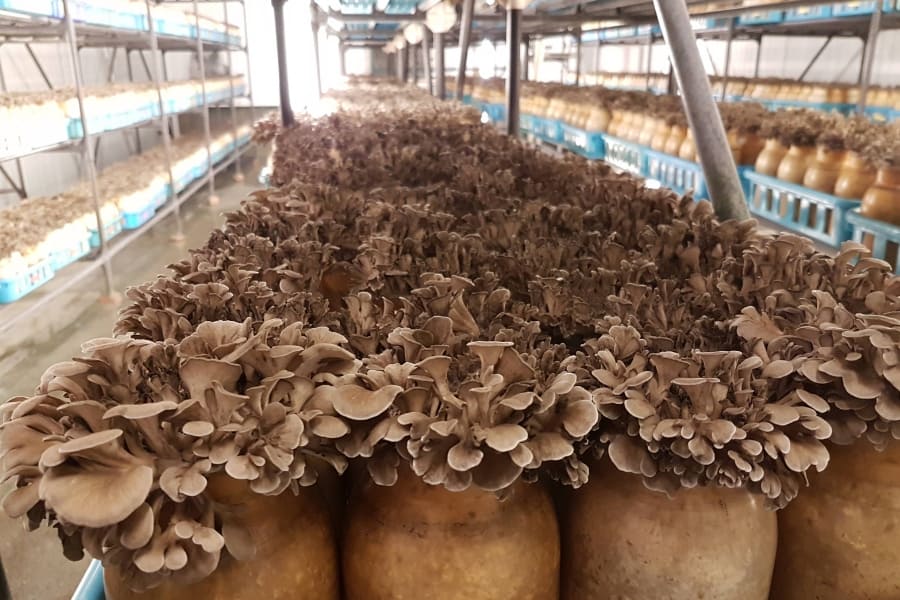
Maitake (Grifola frondosa)
Maitake can be grown successfully in bottles, but as mentioned above, the fronds are significantly smaller than those which are grown in bags.
This is due to the smaller mass of substrate or “battery” available for forming the fruits. Bags can hold 5-10 lbs of substrate, whereas bottles will typically contain much less.
Shiitake
One species that is famously not grown commercially on bottles is Shiitake. This is interesting because it means large commercial bottle operations might offer everything except Shiitake- even though it is a commonly cultivated and widely consumed mushroom.
Shiitake is can be grown on logs, but it is most common method is to grow on 5 lb supplemented sawdust fruiting blocks.
Bottle Types
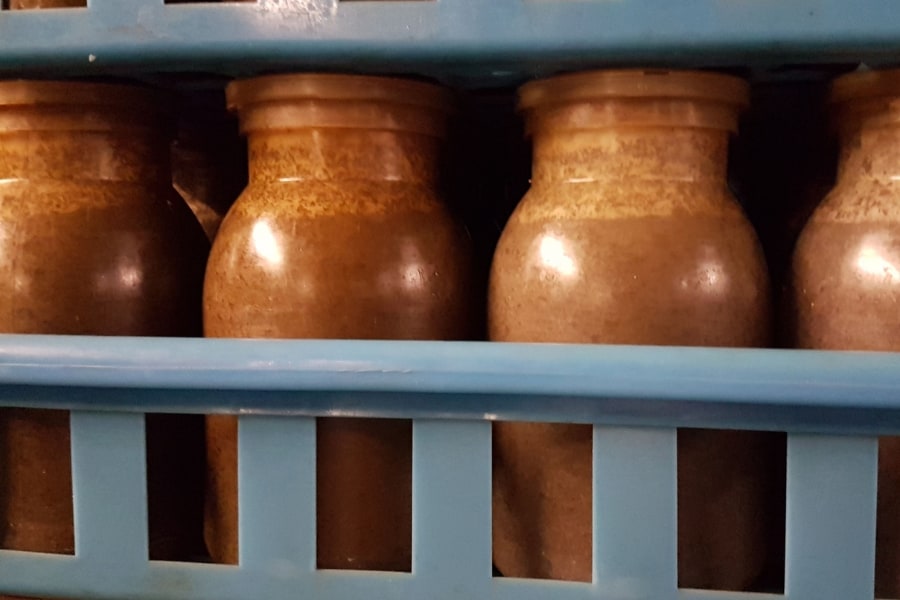
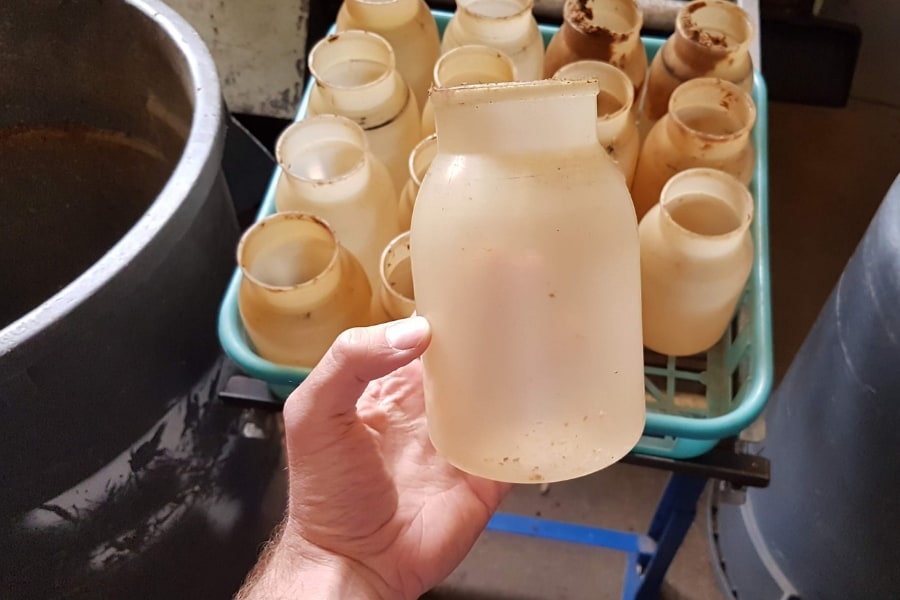
In commercial production, growers use specially made plastic bottles that can be re-used over and over for several years.
They come in all different sizes, and shapes, which growers select based on the species of mushroom grown, and the type of equipment.
The bottles are also fitted with a specially designed filter lid. This allows the mycelium to breathe while it is growing through the substrate, while at the same time can filter the incoming air and protect the substrate from contamination.
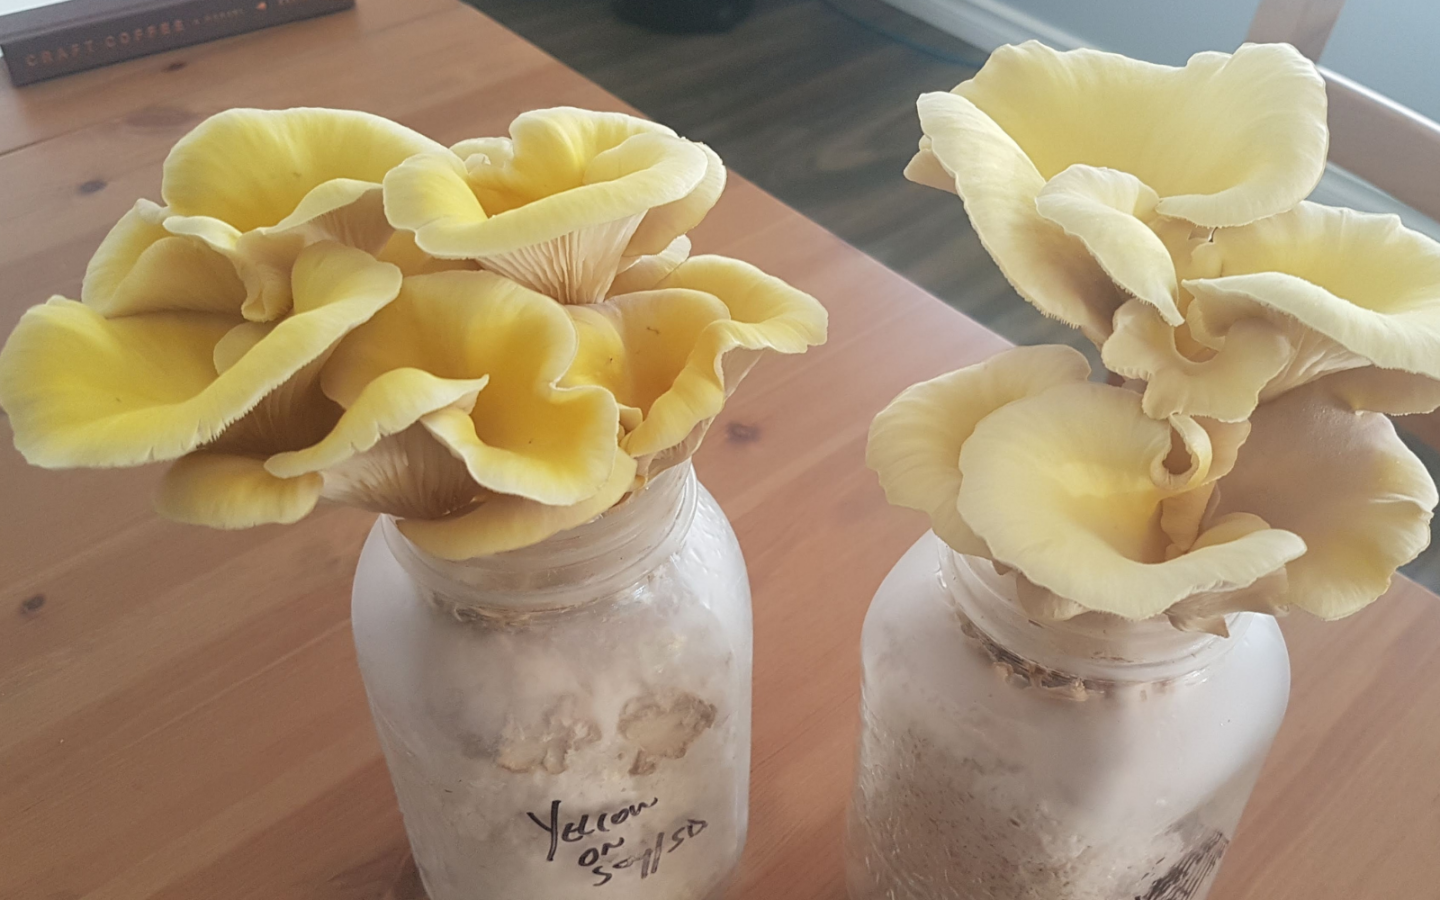
Of course, if you don’t need to match the bottle size to a machine, you have a few more options. Home growers will often use glass mason jars, which offer an environmentally friendly alternative to plastic mushroom grow bags.
Growing In Bottles At Home
If you haven’t tried to grow mushrooms in bottles before, I’d highly recommend it!
This is especially true if you have access to a pressure cooker, but don’t have any mushroom grow bags.
WHAT YOU NEED
- Quart Sized Mason Jars with Lids
- Substrate (Hardwood Sawdust and Bran, or Soy Hulls)
- Poly Stuffing
- Pressure Cooker
- Mushroom Spawn
STEP 1: Get Bottles and Make Lids
Your best bet for growing mushrooms in bottles at home is to use quart sized mason jars.
These are commonly available- in fact, you probably have number of them sitting around your house!
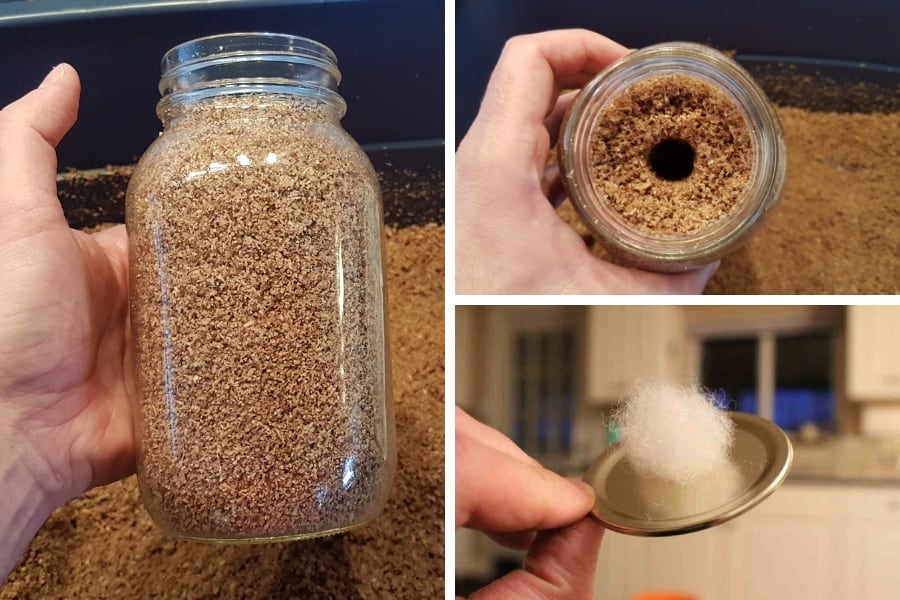
You’ll need to modify the lid in order for the mycelium to breathe while it’s colonizing the jar. One simple way to do this is to drill a ¼” hole in the center of the lid and pull through a wad of pillow stuffing. This is no different than the jars used for making grain spawn.
This poly stuffing acts as a filter. If you want to get fancier, you could instead use felt, or specially made synthetic filter discs, but the poly stuffing by itself is quite sufficient.
STEP 2: Add Substrate, Bore Hole and Sterilize
Both supplemented hardwood sawdust, or the “master’s mix” (a mix of sawdust and soy hulls) are suitable substrates for growing in jars.
Mix and hydrate the substrate in a large tote, and then fill the jars up to about 0.5 inch from the top. Knock the jars on a firm surface to lightly pack the substrate.
Take the back end of a wooden spoon, or something similar, and bore a 3/4” diameter hole in the center of the substrate. Make sure the hole goes right down to the bottom of the jar. This hole will be filled with spawn during inoculation.
After you have the hole bored into the substrate, you need to be careful handling the jars. Rough handling could cause the hole to collapse, making it more difficult for the spawn to fully colonize the substrate.
Sterilize the jars at 15 PSI for 90 minutes. Make sure the jars are standing upright in the pressure cooker or autoclave. Laying the jars on their sides will likely collapse the holes.
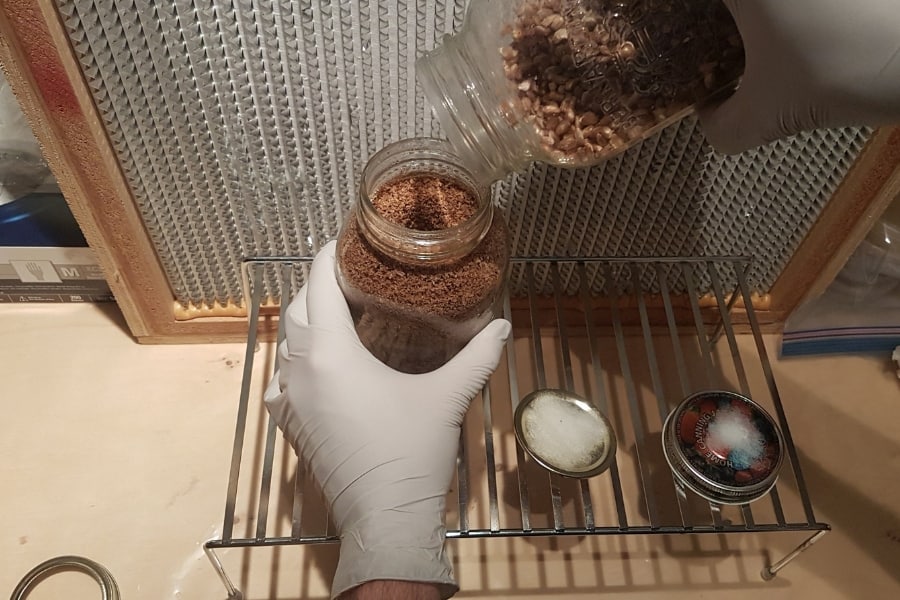
STEP 3: Inoculate and Colonize
Once the pressure cooker has cooled, the jars can be inoculated.
This is done by pouring grain spawn in, filling the hole in the center of the substrate. Boring the hole in the center and filling it with spawn allows the mycelium to grow from the center outwards, and is critical for timely colonization of the substrate.
This is best done in front of a laminar flow hood, but if done fast enough, can likely also be accomplished in a still air box or glove box.
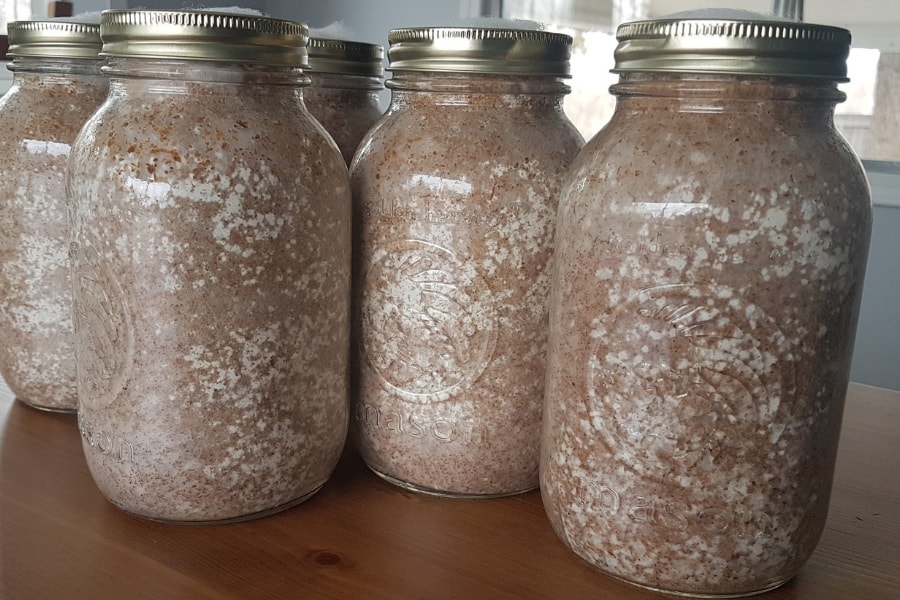
Once inoculated, seal the jar with the lid, and place it on a shelf at room temperature, away from direct sunlight. Depending on the species, the jars should colonize in 3-4 weeks.
The colonization period for bottles is significantly longer than if using the bag method. This is because mushroom grow bags can be thoroughly mixed after inoculation- unlike bottles. An abundance of widely dispersed inoculation points in the bagged substrate leads to faster colonization.
STEP 4: Scratch and Fruit
Once the jars are fully colonized, open the lid and remove the very top layer of mycelium with a fork. This re-invigorates the mycelium and helps to induce an even pin set.
Once scratched, place the jar in fruiting conditions, and wait for pins to form. The scratched mycelium should recover and start to form pins within 3-4 days.
You can also place a wet, breathable cloth (like Tyvek or cheese cloth) over the open jar, to help maintain constant humidity. Alternatively, remove the poly stuffing from the lid and place it back on the jar while waiting for pins.
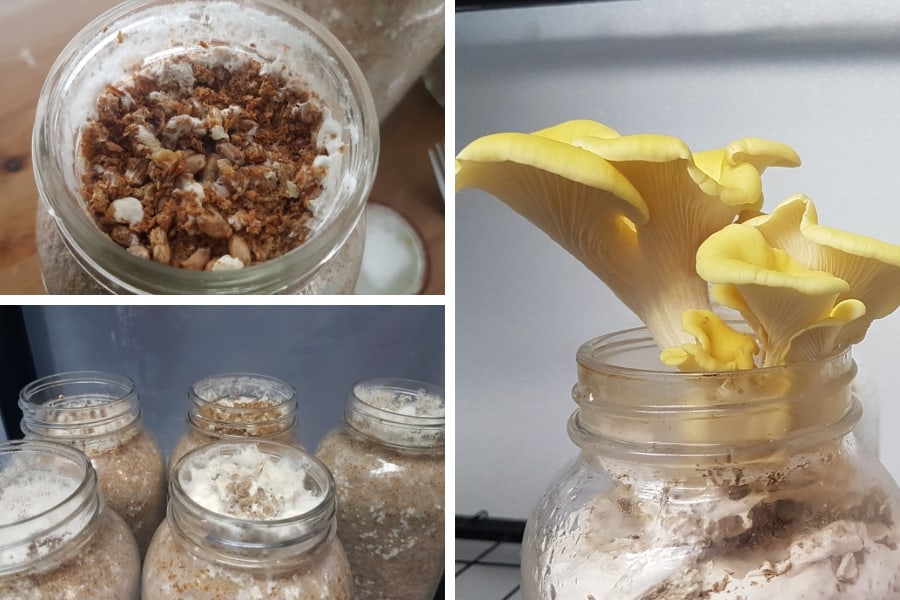
Once a full pin set forms, fully expose the top of the jar to fruiting conditions and wait for full mushrooms to form.
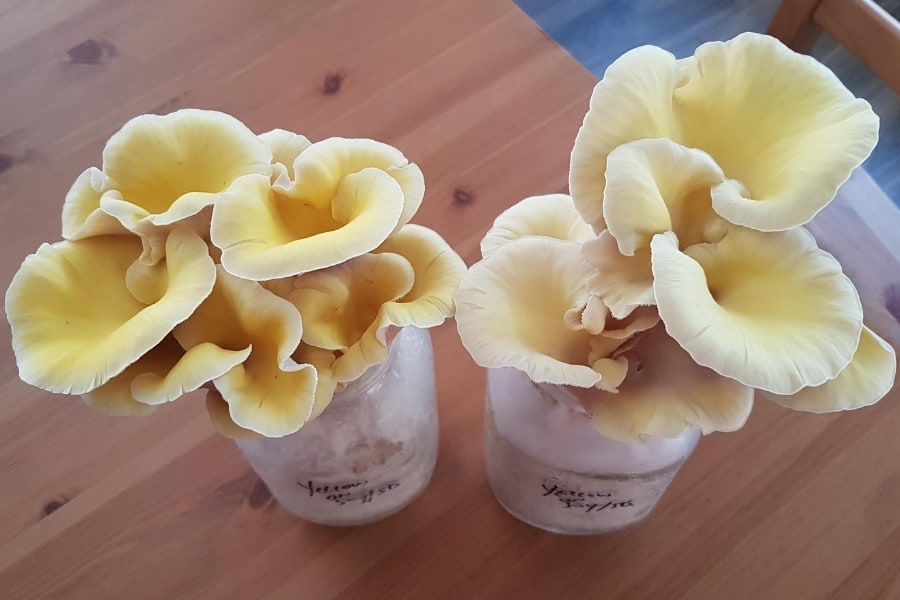
The mushrooms can be harvested by simply twisting the fruits off at the base, or cutting right across the top of the jar. Mushrooms that are harvested by pulling off the fruits- rather than cutting– should last longer in the fridge.
The bottles can be cleaned out by using a corkscrew or fork to scrape out the remaining substrate.
Large Scale Bottle Operations
Large scale bottle culture farms are incredibly efficient, and built to pump out high quality mushrooms in massive quantities.
They follow essentially the same process as you would do at home… but instead of manual labor, the hard work is done by cleverly designed machines.
The Filler Machine
The first machine in the process simply fills the bottles and punches a hole through the center of the substrate.
The machine is usually fed with pre-mixed substrate from a hopper or a conveyor belt. The bottles come out of the machine on trays, are fit with lids, and transported to the autoclave.
Many bottle operations use liquid culture for inoculation, instead of only using grain or sawdust spawn. If that is the case, the machine makes about 5 small perforations through the substrate, rather than just one large one in the middle.
The bottles are then brought to a large steam autoclave where they are sterilized for an extended period of time.
Once out of the autoclave, the trays of bottles are brought into a clean room where they can be inoculated.
Inoculation Machine
This is a machine that adds mushroom mycelium to the bottles.
The machine removes the lid, fills the hole with spawn (either grain spawn, sawdust spawn, or liquid culture), and replaces the lid and sending the bottle down a conveyor. One machine can inoculate multiple bottles at once, making for an incredibly efficient process.
This process needs to be done in a HEPA filtered, positive pressure clean room- meaning the entire room is under conditions similar to the air in front of a laminar flow cabinet.
Scraping Machine
After full colonization, the bottles are brought to another machine that removes the lid and mechanically scrapes the peripheral of the top layer of mycelium from the substrate. This process is known as “kinkaki” in Japanese, which means “to scrape germ”.
This scraping is done to ensure a more vigorous and even pin set.
Once scraped, the bottles are flipped upside down and left for a few days before being put into fruiting. This is done to get the substrate correctly hydrated, allowing the substrate to stay humid without forming pools of water.
Substrate Removal Machine
Once the mushrooms are harvested, the bottles are sent to yet another machine which flips them over and pulls out the spent substrate with a screw.
The substrate is then piled up, and most often used to make compost.
The bottles can then be re-used, over and over again.
NOTE: Lots of the pics in this post are from my awesome visit to Mycopia Mushrooms.
Growing In Bottles
Whether you’re a small scale hobby grower, or a full on commercial operation, you should consider trying to grow mushrooms in bottles. Not only does it produce less waste, but it can be scaled up and mechanized to be pumping out fresh mushrooms, non-stop.
Hello,
I would like to try this method in Central himalayas. Glass bottles (1 litre volume) in India can be obtained at £0.12 per bottle if you purchase them in bulk. Add £0.021 per metal lug lid and mayve £0.02 per bottle for transportation. So it is worth experimenting.
I was googling for this method and found your article — thanks!
The step of adding grains in a hole in front of a flow hood seems too manual and not really low-tech. I would like to experiment with injecting liquid culture to a sterilized glass jar of sawdust + hulls + millet grains via an airport lid. Would you have any recommendations on this technique? Theoretically this seems attractive because there is no manual work of opening the jar, introducing spawn and closing it again.
I agree, the adding of the spawn is really the “bottle neck” of the whole operation, and is better suited for large operations and machinery. I think you could definitely go the liquid culture route, I would have a jar of liquid culture, and a syringe, sterilize the syringe, fill with liquid culture, and inoculate jars 1 CC at a time. Instead of having a large hole in the middle of the substrate, just leave it full or put 5 smaller holes or perforations into the substrate for the LC. Best of luck!
Sounds like only one mushroom per container, or will they re-fruit after initial harvest? Thanks
Hey Dave! Yes, typically when grown in bottles like this, only one flush is harvested. After this there is diminishing returns.
I am going to try this method, it seems like it could work really well, I do wonder though, could this work if one were to take a two liter out one gallon bottle/jug, drill some holes in the side(s), temporarily cover them (for the inoculation) with something airtight, and do the same or similar process and get a “mushroom log” of sorts? Because I think i’m going to try that as well.
Where can the plastic grow bottles be purchased?
Hey Linda! Check out some of the suppliers on Ali-baba, shipping costs are high, but sometimes you can get them in lower minimum order quantities.
Do you think that the bottle method would work with coffee grounds in place of the sawdust? I’ve read a bit about using coffee grounds in buckets or bags, but I haven’t seen anything on bottles.
Hey Marianna! Probably as a supplement, but just straight coffee grounds likely wouldn’t be that effective.
Hey! Thank you for the Artikel!
Why cant you mix the Substrate wich the Spores and need to Make One Big hole? Wouldnt it then also go faster when mixing?
I also Read About the king Oster mushroom that you can harvest it More offen out of One Glass?
Does the Glas certaily needs to be in the dark or just Not in direkt sunlight?
Trank you for Answering!
Thess
You could mix the substrate with the grain spawn, but it would be hard to do in a sterile manner, with the hole you can quickly open up the bottle in front of a flow hood and dump the grain in. And yes, with King Oysters you can probably get more than one flush, but hard to say if it’s worth it 🙂 And no, darkness is not necessary for colonization, although it is good practice because light is a pinning trigger.
Seems like a dumb question, but is there a reason you can’t shake the jar to mix the spawn with the substrate? Thanks!
Hey Sam!
Not a dumb question at all- in theory this would work, but practically it is really difficult/impossible to actually mix the grain spawn by shaking… just not enough room in the jar.
I’m currently reading Pail Stamets’ book On mushroom cultivation. He used to fill the jars about 75% in order to SHAKE them (depending on species and speed of colonization at 5 days and again at 8 days). But that technique is for making grain spawn to be mixed into other substrates. If fruiting from the bottle, 75% fill might be too far down, far away from the bottle’s opening. Just sharing.
*Paul Stamets’ book, forgive the typo
I gave this a go and learned a few critical lessons. 1) Make sure you pack the sawdust tightly into the jars. 2) When they’re fully colonized and you’re ready to initiate fruiting, cover them in paper bags (or something) to block light from all but the top of the jar. Some air pockets plus light exposure caused my oysters to start pinning deep inside the jar. I stuck them all in papers bags and now I’m just waiting to see if they’ll fruit out the top as intended.
Hi Tony,
I’m Harry from Indonesia, a country in south east asia :-).
I have a straight and short question, and I hope you don’t mind to reply it.
Indonesia has 2 seasons, rainy and summer. And now is rainy season. The question is, why lately my mushrooms (white oyster) are growing “wet”, or too moist? Is there any solution to reduce the water contains?
ps: the substrates are made from hardwood sawdust, mixed with wheat bran and calcium oxide.
Thank you,
Harry
Hello,
Not bottle specific but just wondering what temp is your chamber at while fruiting enoki? I’ve been trying to use a peltier cooler with heat syncs but it seems to condense the humidity out of the chamber.
Thank you
Enoki loves cool temps- like 13-15 deg C is perfect!
I am new to this, but think I could start with this simple project for enokis. Is there a special mix of humidity and CO2 level that needs to be maintained at each step? Or is room temperature sufficient for the entire process? Thank you.
Thanks so much for this – and all the information you share! Have you ever grown, via bottle culture, mushrooms that require casing before fruiting? Anything you would note, if so? Many thanks!
Hi Tony,
Should I sterilize or pasturize the masters mix (fruiting substrate)? Some growers are recommending to only pasturize fruiting mix so as not to kill beneficial bacteria that sterilizing does. I have also read that sterilized fruiting substrate is more susceptible to contamination.
Since you sterilize your fruiting substrate, I’m assuming that works just fine and you have no problems. with contamination. You do, however pasteurize your straw substrate.
So, I’m curious as to your thoughts on when to/when not to pasteurize fruiting substrate?
Thanks for all your great videos and information!
Chad
Hi
said, sawdust, I see that you grind it finely, that does not slow down the evolution of the mycelium?
dsl for my english, i use a translator
Like to make needle mushroom ko
Hi Tony,
Inspired by your video I started some enoke in pp bottles filled with master’s mix. The first ones fully colonized in 25 days at 72 degrees F. I move a couple to my fruiting chamber (63 degrees, 85% humidity) removed the caps and scraped the tops. It’s been 7 days and no sign of pinning. Do you have data on expected time for colonization and fruiting for enoke? I’m about to start some maitake in pp bottles and the same info would be helpful for this and other species.
Thanks,
Chris