Growing Blog
Cold Water Lime Pasteurization For Growing Mushrooms
Contents
- What is hydrated lime?
- ✘ What Type of Lime WON’T Work?
- ✔ What Type of Lime WILL Work?
- Cold Lime Step By Step
- What You Need
- STEP 1: PREPARE STRAW
- STEP 2: PREPARE WATER BATH
- STEP 3: ADD STRAW AND SOAK
- STEP 4: DRAIN AND INOCULATE
- STEP 5: COLONIZE AND FRUIT
- A Recent Grow With Hydrated Lime
- Other Low-Tech Methods
- Anaerobic Pasteurization
- Laundry Detergent and Soap
- Ash Pasteurization
- Give Lime A Chance
I’ll admit, pasteurizing straw in hot water with a propane burner can be a bit of a pain.
You need a large burner, a full propane tank, and plenty of time to make sure the whole process goes smooth. Even more of a pain, it needs to be done outside or in a large shop- because you can’t set up a propane burner in your living room!
Which leaves many new growers wondering…
“Isn’t there another way to pasteurize large amounts of straw?”
Yes!
It’s called Cold Water Lime Pasteurization, and it’s a cheap and effective low-tech way to prepare substrates for growing mushrooms.
The process is simple. You basically just soak straw for 12-24 hours in a bath of cold water that has been treated with hydrated lime.
The lime will rapidly and dramatically increase the pH of the water, causing the mold spores, bacteria, and other contaminants in the straw to be killed off.
Once drained, the substrate can be inoculated with your mushroom spawn. The mycelium will then be able to grow in squeaky clean straw, unhindered by other competing organisms- for at least a little while!
What is hydrated lime?
Hydrated Lime is basically just Calcium Hydroxide, chemically known as Ca(OH)2, and is often used in industry for a whole whack of different reasons, from pickling cucumbers to treating sewage water.
This white powder is known by many different names.
BUT- not all Lime is created equal, and some types will not work for growing mushrooms.
✘ What Type of Lime WON’T Work?
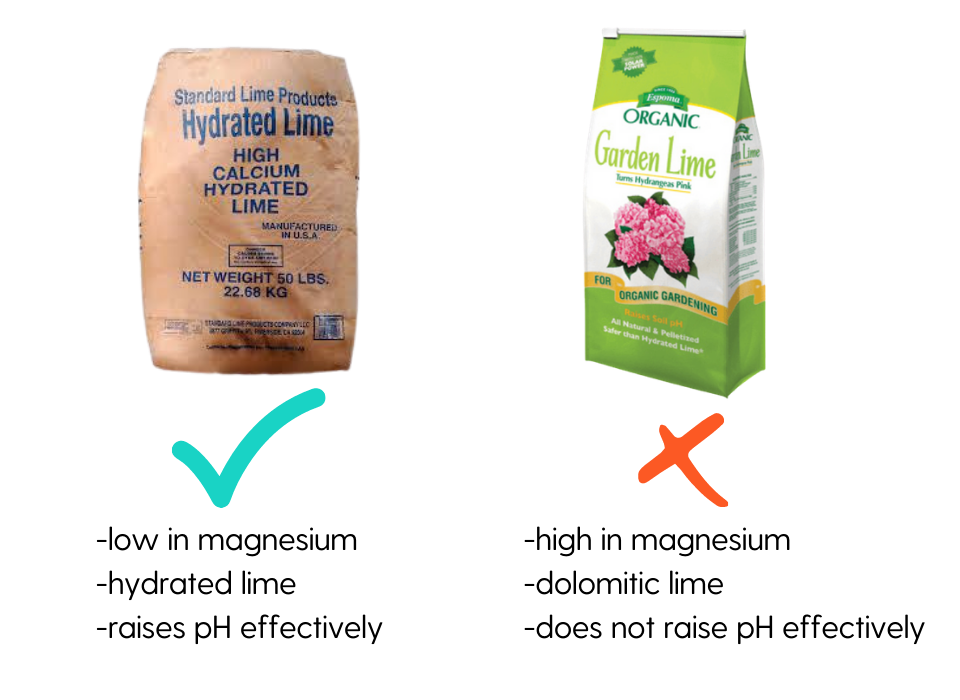
Make sure you don’t get the type of lime that is used for treating garden soils, or buffering substrates. This is too weak! It is typically found at garden centers in pellet form or crushed stone.
This is Calcium Carbonate Lime. You might see it called a bunch of different names including dolomitic lime, garden lime, quicklime, limestone, chalk, and many more. This will not be effective in raising the pH high enough, or fast enough to kill the contamination. (check out Wikipedia for a quick primer (‘limer?) on pH)
Also, you want to make sure that the lime you use is low in magnesium, and high in calcium.
This type of lime is typically WAY high in magnesium. High concentrations of magnesium will retard the growth of mycelium, even after the substrate is drained and inoculated.
✔ What Type of Lime WILL Work?
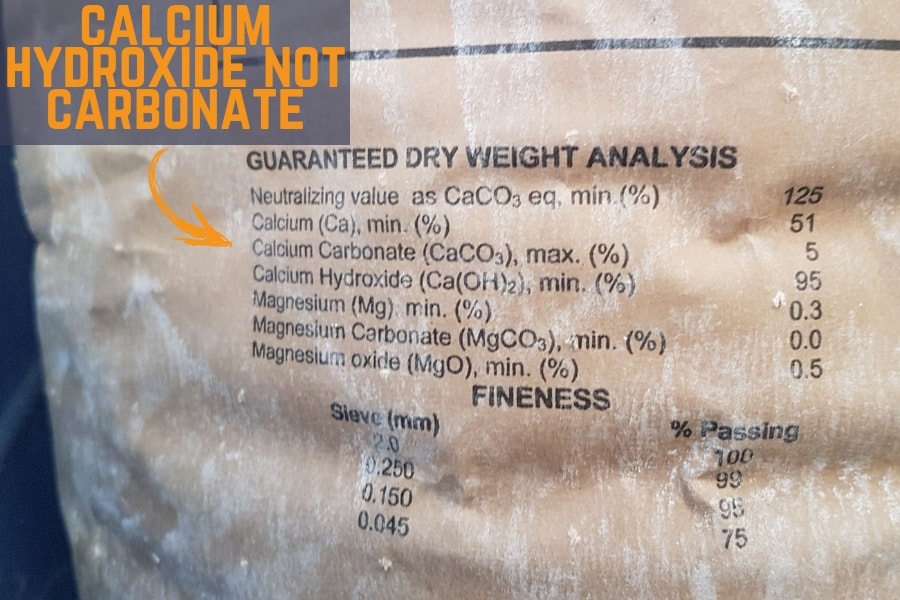
The type of lime you want is Hydrated Lime that is low in magnesium.
This white fluffy powder is manufactured by a process that treats “quicklime” with water, changing the chemical structure by converting oxides to hydroxides.
Keep in mind that it is possible to find a garden variety “hydrated lime” that is high in magnesium. This will not work. Chances are, you’ll need to go to an agricultural supply store or similar to find the correct type of lime. It isn’t always easy to find, so if you have trouble trying to get some, don’t be surprised!
The lime I used was picked up at a local UFA, and is the type typically used to treat drinking water on acreages.
How Does Lime Work?
Lime works by rapidly altering the pH of the water, making it extremely alkaline and killing off the contaminants in the substrate.
Once drained off, the substrate has a low concentration of living contaminates, giving mushrooms the upper hand.
I haven’t tested it, but I’m guessing it’s a combination between the substrate pH coming back down to earth after being drained AND the mycelium’s natural ability to be resilient in high pH environments. Either way it works pretty well!
SAFETY FIRST
Hydrated Lime is potentially hazardous- so be careful when handling it.
I like to wear gloves, safety glasses and a mask. Getting it on your skin can cause rashes and burns, breathing it into your lungs can cause respiratory issues, and getting it in your eyes can be especially dangerous.
Always use protective equipment and don’t say I didn’t warn you!
Cold Lime Step By Step
This type of substrate treatment is easy for most people to do at home.
It’s even used by some small-scale commercial mushroom growing operations that want a low-tech, cheap and effective way to pasteurize straw.
The overall process is very similar to growing mushrooms on straw with heat pasteurization, the only difference is to replace heat with lime.
What You Need
- Hydrated Lime (about 6 grams per gallon of water used)
- Water
- A 55 gallon drum, or large tote
- Straw (wheat straw or oat straw)
- Poly Tubing or Other Suitable Cropping Container
- Spawn, about 2.5lbs per 25 lbs wet substrate.
STEP 1: PREPARE STRAW
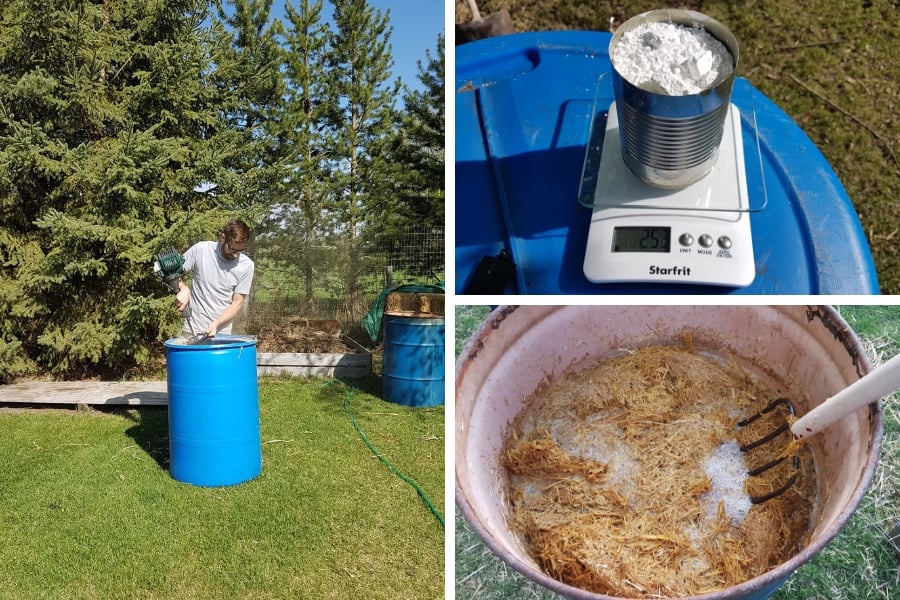
Chop your straw into 2-3” pieces. You can do this with shears if you have a small amount, or by whipping it up with a weed-whacker in a large drum.
This is not 100% necessary, but chopping the straw impacts how easily the mycelium can work its way through the straw, and makes the nutrients in the straw more accessible.
The result of chopping is faster colonization, and very likely a much bigger yield.
STEP 2: PREPARE WATER BATH
Add the hydrated lime to the water in a large drum or tote.
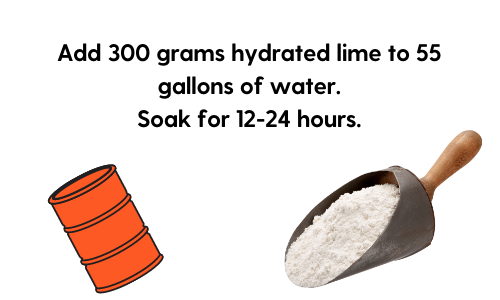
A good rule of thumb is to use about 6 grams of hydrated lime for every 1 gallon of water.
If you have a 55 gallon drum of water almost full (50-55 gallons of water), this equates to about 300-330 grams of lime. (doesn’t have to be exact)
If you don’t have a scale, you can estimate with volume and use about 1-1.5 cups lime per 55 gallons of water.
STEP 3: ADD STRAW AND SOAK
Add your straw and soak it in the lime bath for 12-24 hours.
Ensure that the straw is evenly mixed through the water bath so that it is all treated equally. Straw floats, so you might want to place something heavy on top to ensure full submersion. I like to use a cinder block and a metal grate on top of the straw to hold it down.
STEP 4: DRAIN AND INOCULATE
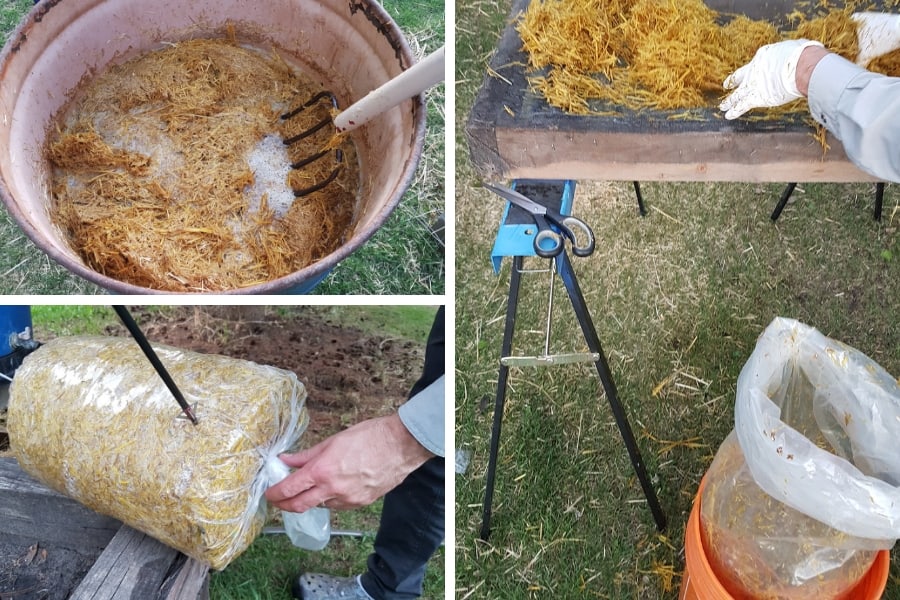
After 12-24 hours of soaking, remove the straw and let it drain for 20 minutes or so. You don’t want to leave it so long that new contaminates have a chance to settle in the substrate, but you also want to ensure that most of the water drains off so that the straw is not overly wet.
Inoculated the straw at a rate of 10-15%. You can either mix it all together, or place it down in layers. One of the best options for cropping containers is poly-tubing. I like to use 14” lay flat diameter tubing, which makes straw logs that are about 9” in diameter.
Make sure that you cut holes in the poly tubing to allow for the mycelium to breathe while colonizing. I like to use an arrow head and stab holes all around the log, every 4 inches or so. Make sure you also place holes in the bottom of the log so that any excess water can drain off.
STEP 5: COLONIZE AND FRUIT
The straw should colonize relatively quick, depending on the species and the spawn rate. The mycelium should start growing right away. Place the log in a room temperature environment away from direct sunlight. In 10-14 days, the log should be fully colonized and ready to be placed in fruiting conditions.
That’s it! Again, it’s very similar to the process for heat treated straw. Takes a little longer, but requires less work overall.
A Recent Grow With Hydrated Lime
I just finished up a grow using Cold Pasteurization of straw and had some pretty good results!
For this grow, I chose Blue Oyster (Pleurotus columbinus) and Yellow Oyster (Pleurotus citrinopileatus) because they’re both fast growing, high yielding strains that typically do well on straw substrates.
I decided to fruit them outside, because the conditions were right, and because growing these species outside can produce some nice large fruits without too much hassle!
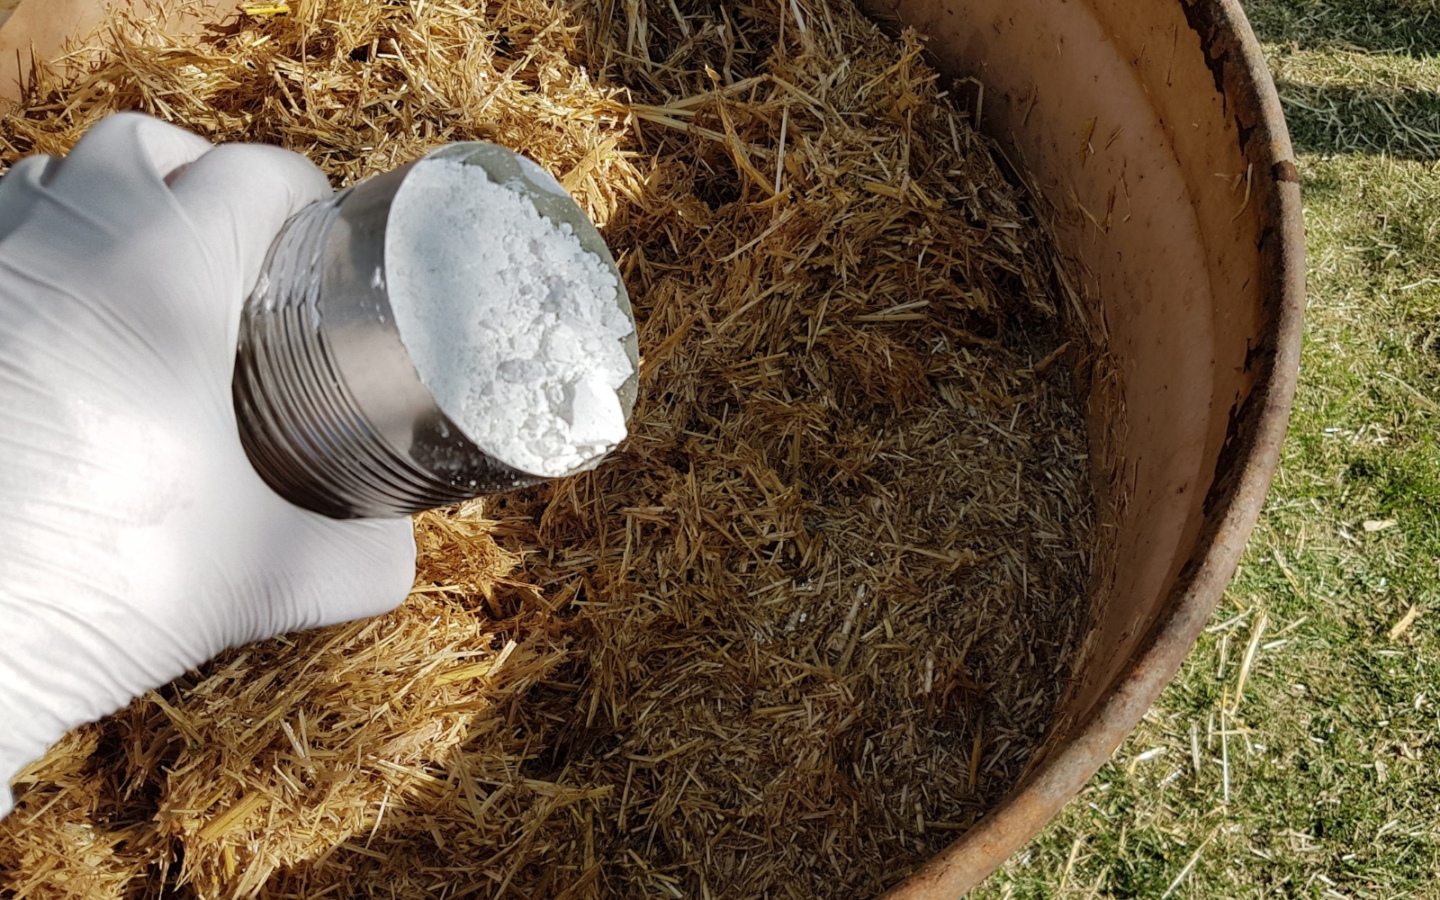
First step, I chopped the straw using a weed whacker in a large decommissioned rain barrel. I then soaked the straw for about 18 hours in a 55 gallon drum full of cold hose water and about 300 grams hydrated lime.
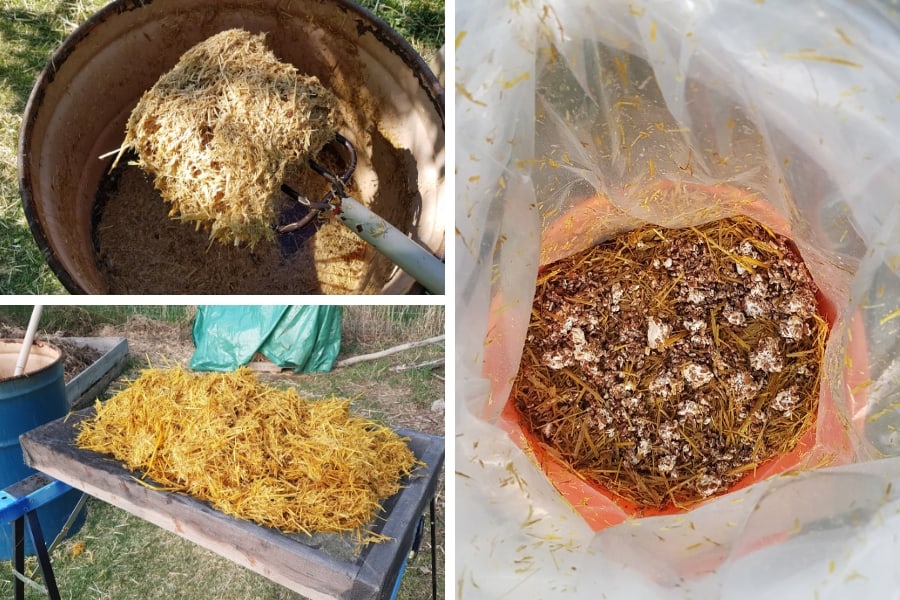
The straw was then piled up on a large mesh screen for about 20 minutes to drain. It’s surprising how much the color of the straw changes after the lime water bath!
It appears so much more yellow/gold from the treatment. At first, I thought the straw might have been fried in some way… but it turned out to be no problem at all!
Once drained, I stuffed the straw into poly tubing and inoculated it with grain spawn. Instead of mixing the spawn and straw before loading the tubes, I decided to add the spawn to the log in layers.
This involves grabbing handfuls of straw, stuffing it into the log, sprinkling a thin layer of spawn, and then repeating until you run out of straw or spawn. The result is a kind of “layer cake” of spawn and straw- which, believe it or not, will colonize just about as fast as if it were thoroughly mixed.
Keep in mind- If you decide to use this method, make sure that you really press down each layer as you are making it, so that there are no large air pockets or areas of loosely packed material.
Once the logs were stuffed, I stabbed the outside of the log with an arrowhead, about once every 4 inches or so. This included perforating the bottom of the log so that any excess water can drain off as the log colonized.
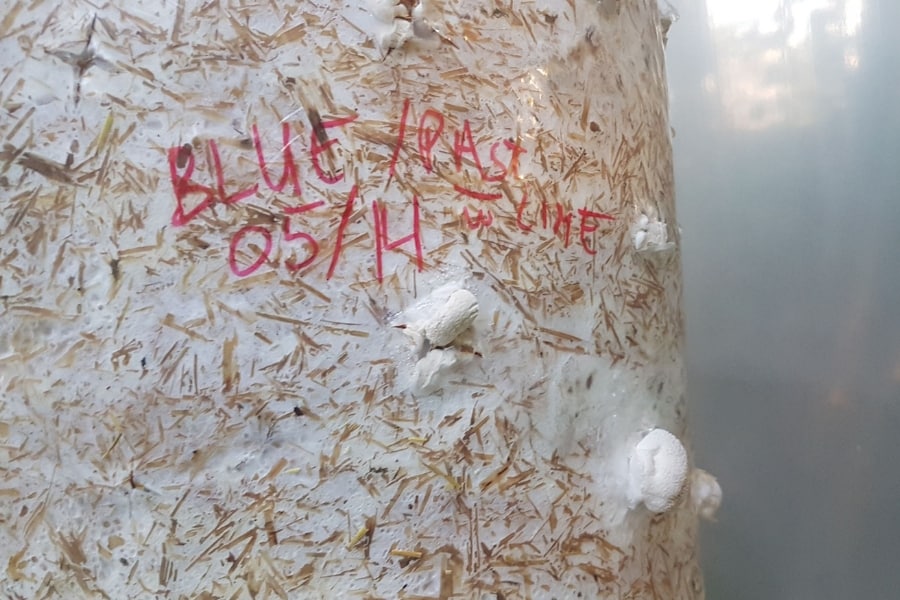
The logs were brought into a cool storage area, inside, so that they could colonize. After about a 7-10 days, the logs were fully colonized, and ready to be brought outside.
I hung these logs in a custom-made arbor, complete with a poly windscreen to help prevent the fruits from drying out. Oysters definitely need LOTS of fresh air, but if there is a constant wind, even just a slight breeze, the fruits will inevitably dry out and abort. You can usually remedy this by placing the log near the ground, deep enough into the trees, or simply draping it in poly sheeting.
The two logs fruited nicely!
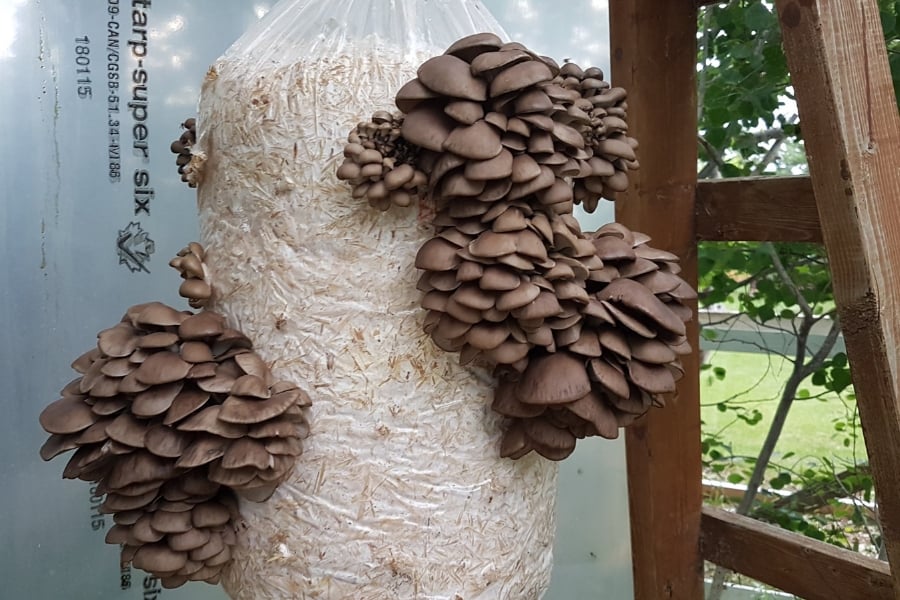
The Blue Oyster, of course, had no problems producing some nice large cluster. I did however have to get ‘em pretty early so that the bugs didn’t take over.
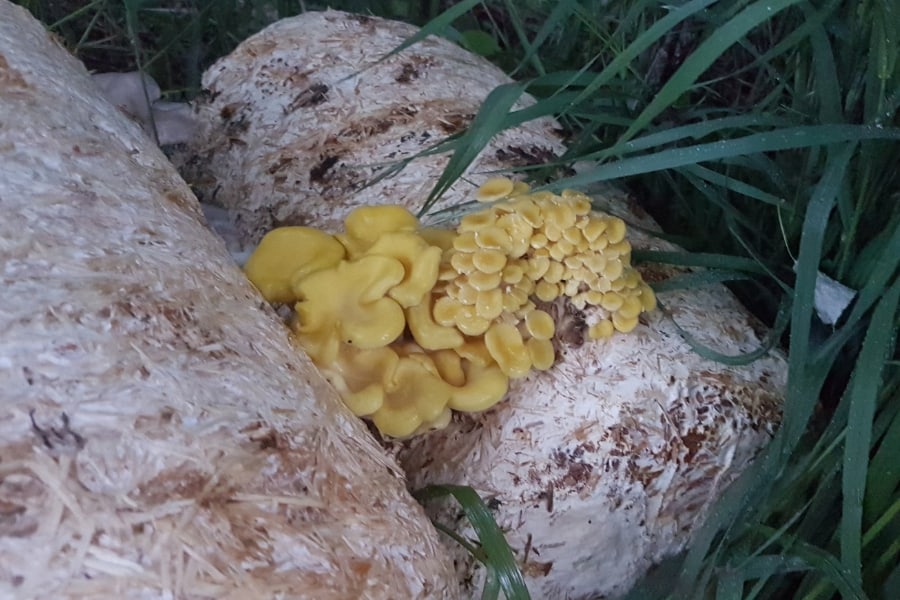
The Yellow Oyster also fruited nice, although I didn’t manage to snag any pictures.
That being said, once I thought the log was totally done, I stripped off the poly tubing and threw it in the compost pile… where it decided it wasn’t done yet! This happens often, especially with Oysters, who just like to keep fruiting and fruiting and fruiting.
Other Low-Tech Methods
Of course, both heat pasteurization and lime pasteurization are effective, but they aren’t the only way to treat your substrate. There are some other methods that are cheap and effective, that you might want to try for yourself.
Anaerobic Pasteurization
Although there are a million different types of bacteria and other contaminants that can affect your grow, you can divide them into two groups- aerobic (oxygen loving) and anaerobic (oxygen hating). Basically, some contaminants need oxygen to thrive, while others need a complete lack of oxygen in order to survive.
We can take advantage of this to manipulate conditions and pasteurize a substrate without heat, lime, or any other chemicals. The basic process involves soaking a substrate (such as straw or wood chips) in water, draining, and then placing in a sealed container. 5 gallon buckets work really well.
If properly sealed, the aerobic contaminates will eventually die off, and the anaerobic contaminates will proliferate.
Once the container is opened, and the substrate is exposed to the air, the anaerobic contaminates will die off, and there won’t be any aerobic contaminates to worry about, at least for a little while. This gives the mushroom mycelium enough of a head start to take over the substrate.
This topic really deserves its own post, hopefully I’ll get to that soon!
Laundry Detergent and Soap
Some people have had success using laundry detergent, or even just regular dish soap.
I guess it makes sense, because soap is antibacterial and I’m sure laundry detergent is the same. Although I haven’t tried this myself, the process involves soaking a substrate in cold water with laundry detergent for a day or so, in a very similar fashion to cold water lime pasteurization.
I imagine this might work OK for home and hobby growers, but is not something that would make much sense to do commercially.
Also, I would be a little concerned about the quality of the mushrooms if the substrate is pasteurized in this way.
Ash Pasteurization
Wood ash has also been used to successfully pasteurize substrates. It works in a similar way to hydrated lime, by raising the PH enough to kill off contaminates in the straw.
Some have reported that this method actually results in the best yields of any method, and considering it is a low cost material in many parts of the world, Wood Ash Pasteurization might be the best way to go for many growers.
Give Lime A Chance
I haven’t run any strict trials, but many growers report that hydrated lime pasteurization actually has a much higher Biological Efficiency (BE) than steam pasteurization.
Some growers will actually calculate the exact amount of water needed, so there is no excess high pH water to get rid of. For example, if you had 25 lbs of dry straw, you would use about 10-12 gallons of water, most of which will be absorbed by the straw. This is much different than hot-water pasteurization, where you need to dispose of all the hot water.
All this and you don’t need to wrestle hot straw, continuously monitor temperatures, and burn off expensive propane.
Don’t you think it’s worth giving lime a shot? I sure do!
Hello, can you also use this same method to pasteurize grain? Thanks!
Hey Peter! Unfortunately that probably would not work, as grain needs to be 100% sterilized. Best to use an autoclave or pressure cooker, and sterilize the grains at 15 PSI for 90 minutes.
Hi there Tony,
Really loving these blogs that you’re putting out, super helpful!
Ran across your other page about Masters Mix and was wondering if you thought lime pasteurisation would work on that?
Cheers!
Hey Hugo, glad you like the blog! For the masters mix, I can’t say for sure because I have never tried it with lime pasteurization… my instinct says it wouldn’t work because there is too much nutrition in the soy and would require a full sterilization. If you find out otherwise, let me know 🙂
Don’t! sounds like a waste of time. Closest thing I’ve heard of is making a 55 gallon steamer. The grain is like cooked for 48 hours. The problem I’ve having is endospores wrecking my day. They’re no joke, don’t use a instapot! Get a real pressure cooker. I’ve been letting my grains sit in its filth for a couple days to get those sob’s to germinate to possibly kill them off with my instapot. Until I can get a real pressure cooker bacteria become a real problem.
Hey Tony!
How do you dispose of the hydrated lime solution after you are done with the pasteurization process? Looking to get rid of it in an environmentally friendly way after I finish.
Thanks!
Hey Otto!
You can actually re-use it a number of times, until there is not much water left. I usually just dispose of the last bit in the grass, have no issues. You could neutralize it with an acid though, like vinegar. You would need a pH meter though to be sure.
What is the target pH for the water after adding hydrated lime?
Thank you
Hey William! Not sure to be honest, I will check with a pH meter next time and update this post.
I’ve read ph 11. I hit this mark using wood ash and had good luck w lions mane
Hi Tony
Thank you for this exciting information. Could this be applied on sawdust substrate also?
Yup! I haven’t experimented much myself, but many people use this technique on sawdust and other substrates. I would avoid any type of high nutrient substrate though, like bran ect.
Hi Tony,
First of all ı really appreciate the information you shared as it is so helpfull…So do you mean, we can use the same water for a few times, if we add water to fill the tank up and the same amount of lime? Or when we do this shall we add lime, the amount releated to the added water in the tank? ( sorry for my English🙂)
Hi, can you do the same with other substrates such as hardwood (chips and sawdust) and soy hulls? Thank you.
Yup! I haven’t experimented much with it myself, but people definitely use these same techniques with other substrates. I would avoid anything really high in nutrition though, like bran or even soy hulls probably. Pure sawdust should be good though.
Man!!!!
I really appreciate your tips in here
Right now I am doing kind of a big step in this world
I am doing this in Brazil and there are not many people working in the fungi world
Thanks
Ty
Thanks for these excellent tutorials. Please note you state in second line of Step 2 “6 grams of hydrated lime for every 50 gallons of water,” when you actually mean 6 grams per gallon of water, as you state elsewhere.
Thanks again for for these excellent posts.
Am I the only one who has no idea how much lime to use????
It said 6 grams per gallon of water.
Then later it said 6 grams for every 50 gallons of water.
Then in the next sentence it says for a 55gallon drum, use 300grams of lime?
What in tarnation?
Hey there! Sorry, I should fix that- just a typo. I meant to say about 6 grams per gallon of water, which translates to 330 grams for a 55 gallon drum.
I said about 300 grams for a 55 gallon drum because the drum won’t be completely full so it’s an approximation. That’s what has worked for me…
Blessings for the information I know Mr. Stamets uses the cold water pasteurisation method and it seems very efficient. My question is what is the water(gallons) to straw ratio?
Hi Tony, I was getting excited at using lime pasteurization for rice straw & bran together, then I saw your response to others about it not been ideal for high nutrients, like bran. Just wondering if I could just sterilize bran separately and mix into pasteurized straw, just to avoid the load of work involved in dealing with hundreds of individual bags one has to contend with in the sterilization method. Also, just why wouldn’t hydrated lime kill off contaminants in bran?
No, that would likely not work. The bran would need to stay sterile throughout the entire colonization process, which is only possible if using mushroom grow bags and sterilizing the whole block at once. Hydrated lime will kill off all the contaminates in bran, but it will still likely comntaminate faster than the mushrooms can colonize it once it is exposed to the non-sterile environment.
Hey , thanx for this wonderful blog;
which one in the below link should be the choice?
http://www.nikilime.com/nikilime_product.php#Quick-Lime
I am writing from a tiny village in the Indian Himalayas, wife n me moved here to the mountains 10years back to lead a healthier lifestyle 🙂
Both of us are paragliding instructors and run a very very small outdoor business.
However, to better sustain ourselves, we have decided to get into a very small start up oyster mushroom commercial set-up, as small as reaching a target of 300 to 500 kilo a month, and then staying there…Even if this takes us a year or two to reach this number it’s ok.
We are in the infra setting up stage, and to design this I wanted to be sure about cold pasturizatuon methods, most of the info and practices in India are either hot water (large scale) or chemical treatment ..
http://nrcmushroom.org/html/chemicalsterilization-oyster-.html
It seems, this method leaves no trace in the shroom and is safe for consumption, so wanted to understand if this true.
Anyway, if lime works, I am sorted then…
Does lime get absorbed into the mushrooms? If lime is so caustic will it be potentially harmful for humans to eat these mushrooms? Do you have any data on lime inside mushrooms at the end of this process? Thanks! Jon
This is great I can testify to more than 70% of the information here for I have carried it out to success. However, I am yet to try if the hydrated lime method can go for cornstuck. If any has done that already please share with me your experience
Hi Tony, does it work on sawdust?
Wood chips more likely, sawdust it might be easier just to pasteurize with hot water… but I haven’t tested so do not know for sure…
Thank you Tony.
how much is the yield of one large bag?
Hi there I just wanted say I start my low tech farming for that moment I’m on stage multiple mycelium , some grains 60g each (blue/grey, yellow, pink, king, lion’s mane and reishi) I get from eBay, some grains (white and shitake) I made my self from mushroom bought in store for that moment I processed few different seeds and for me No1 is popcorn , than wheat and barley on second place next one is wild birds seed and last one mallet. I tried yesterday my own seed mix everything what I found in kitchen do mung beans, sunflower seeds , black and brown mustard seed, chick peas, yellow and green peas and much much more well we will see . For now already I have around 25kg grains spawns . I used DIY glovebox and got 100% clean rate , 0 contamination . I have questions: I have access to cheap black poly tube 18″ for 20£ 370m so it’s cheaper than transparent how you think will work ??
Hi Tony, I’ve heard through conversations with other growers that Yellow oysters don’t like lime very much? Or perhaps a better way to word it would be that they don’t grow as well as other varieties on lime pasteurisation?
Hi, do you really need to add supplements such as cottonseed cake, urea, soya meal to the substrate to make it more nutritious to the mycelia? Also if you do add them, can you apply the cold water pasteurisation method?
Hey Tony, I noticed you used pH strips for this process ( in the video). I would like to try it in smaller containers, could you provide pah range suggestions or point me in a good direction? thanks
Is it possible to use an used growing kit instead of spawn? They kit has given two flushes and seems to have mycelium . Thanks
what do you do with the leftover water?
Answered up in the thread, already. You can re-use many times or just throw away in the garden. It will not harm the lawn.
Is the unit of measuremet in US Liquid Gallons?
Hi Tony, I am doing research on different pasteurization methods. You article is very informative. Can you plz give me the year you uploaded this article/page?
Hi Tony,
Will the lime with this percentages work?
CaO 67,1 %
MgO 1,6 %
Ca(OH)2 + Mg(OH)2 84,4 %
SiO2 6,7 %
Al2O3 2,3 %
Fe2O3 1,0 %
SO3 0,3 %
Regards, Bas
In Stamet’s book he recommends 2-4 lbs (~900g-1800g) per 50 gallons. Is this just overkill?
Hey, thank you for this life-saving article. I have 2 questions. My first question is; Did you rinse the straw a second time with clean water after cold pasteurization? My second question is; Is only ultrasonic humidifier used in mushroom production?
When using Lime or Ash why does the high PH kill mold and bacteria already on the substrate, but not the mushroom spawn added afterwards? Is there a rinsing or pH balancing step that I’m not seeing?
according to a webpage without concrete source it is because oyster mushroom can tolerate much higher pH than the main competitor [trichoderma] although that source also said that the fruit appearance may also be affected by the high pH. Also I do believe that the pH would go down over time from absorbing CO2 from respiration/atmostphere
Hi!
Can we use SODA POWER for pasteurization processes of Wheat Straw.
no you can’t for 2 reasons:
I’m in middle Tennessee with humid temps of 70 to 85 degrees with rain showers. My blue oyster mushrooms are fully colonized in bag. How do you suggest I continue? In 5 gallon bucket or in a bed under a shade tree. I have straw & a mixed bag of wood chips. To combat contamination I’ll use the hydrated lime on either sub. By the way you are my” go to mushroom guru” lol!! Sounds corny but ’tis the truth!
Hi Tony,
Thanks for all your information. Besides from a equipment, cost and procedure point of view, what is the difference between cold water pasteurized and autoclaved substrate from a mushroom perspective? What technique do you use and why?
Thank you very much in advance.
Markus